|
Last modified: 2011-12-13
HDR ToneMap: Tone Mapping toolsHDRengine offers three Tone Mapping tools:
What is the Auto Tone Mapper? The Auto Tone Mapper uses a single slider to control all the Tone Mapping effects. It uses sophisticated algorithms that control Tone Mapping, exposure, contrast, brightness and saturation parameters in a fully automated way. Except setting the overall strength of the effect, you have no additional controls.
If you are new to HDR and Tone Mapping, it is probably where you want to start. If you are experienced, use the Local Tone Mapper tool which offers more detailed controls.
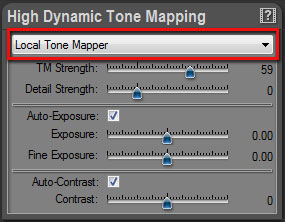
What is the Local Tone Mapper? The Local Tone Mapper is a default Tone Mapping tool. It offers a right balance between control and complexity.
What is the Global Tone Mapper? The Global Tone Mapper offers an entirely different approach to Tone Mapping. Use it for medium dynamic range images and when you are looking for natural results. Images produced with the Global Tone Mapper tend to be soft with low contrast.
What is the best tool to use? All of them! HDRengine always work in real time. You can switch instantly from one tool to the other. Whether an expert user or not, try not to stick to a single workflow. Explore the possibilities: you will be pleased by what you discover!
Selecting the Tone Mapping tool:
HDRengine immediately updates the image and displays the options of the selected tool.
Remark: You can entirely turn off the Tone Mapping module by selecting None. Use this option when you want to edit the image the traditional way using exposure, brightness and contrast while still benefiting from the high precision of the 96-bit per pixel rendering engine.
|
|
| Copyright © 2025 Oloneo SAS |