|
Last modified: 2011-06-02
HDR ToneMap : Créer un ProjetOverviewAn HDR ToneMap project requires two or more photos. For better results the photos must share the same aperture and same ISO. Each of the photos should show the same scene taken at different shutter speeds.
The easiest way to achieve that is to set your camera in Aperture Priority mode (Av or A mode) and enable the bracketing feature. The three or more photos should cover the entire dynamic range of the photographed scene. In other words:
A good starting point is to take three photos spaced of 2 EV (Exposure Value). For instance:
Scenes with a very high dynamic range may require more than three photos.
For high quality results, it is recommended to reduce the Exposure Value and increase the number of photos. For instance:
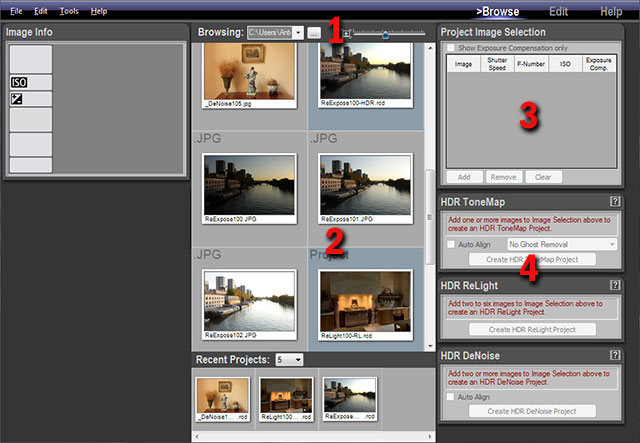
Creating the project is done in four steps:
Step 1, locating the photosIn order to create a new HDR ToneMap project, you have to first display the photos needed for the project in the Browse Workspace.
Selecting a folder and displaying the thumbnails:
The Browse Workspace now displays the photos contained in the folder you just selected.
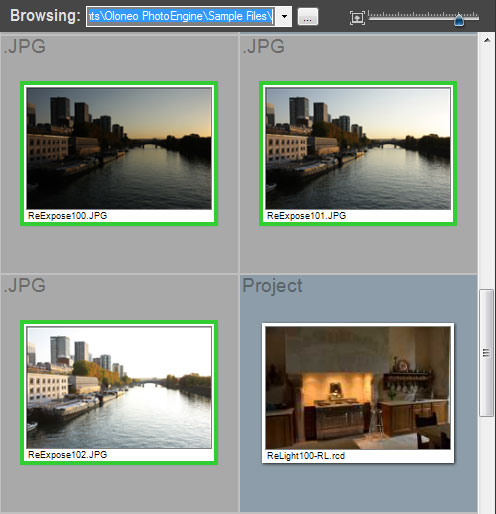
Step 2, selecting the photos
Selecting photos:
Or:
A green frame is displayed around the selected photos.
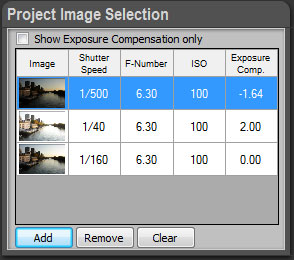
Step 3, adding the photos to the project selection panelAdd the photos selected at the previous step to the Project Image Selection panel. Adding photos to the Project Image Selection panel:
If the panel already contains photos from a previous project, you have first to clear the Project Image Selection list. Removing all photos from the Project Image Selection panel:
Removing one photo from the Project Image Selection panel:
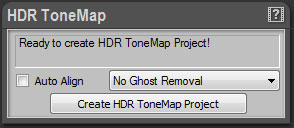
You are now ready to create an HDR ToneMap project.
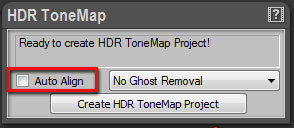
Step 4, creating the HDR ToneMap projectAt this point, PhotoEngine can create the HDR ToneMap Project. The HDR ToneMap panel should display: “Ready to create HDR ToneMap Project!”
HDR ToneMap projects have two options: Auto Align and Ghost Removal.
What is Auto Align? If you are not using a tripod the camera may move when bracketing. The Auto Align feature attempts to align the photos when assembling the images.
When to use Auto Align? Use Auto Align only when taking photos handheld. Never use Auto Align when using a tripod. The additional processing always slightly degrades the resulting image. For high quality results, use a tripod and turn Auto Align off.
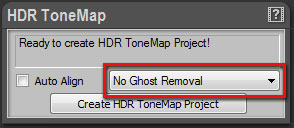
What is Ghost Removal? The Ghost Removal feature attempts to detect and remove moving peoples and objects in a set of photos.
When to use Ghost Removal? Use Ghost Removal only when photographing non static scenes such as: crowds, cars, trees in windy condition, waves, etc. Never use Ghost Removal for static scenes such as: architecture, real estate, interior design, etc. The additional processing always slightly degrades the resulting image.
How to help the Ghost Removal feature? Ghost Removal is a very complex technology and may fail. For instance, it is not possible to remove several moving objects when they overlap across several photos. The reason is that none of the photos contains the background. The best way to avoid issues is to increase the number of photos. Instead of taking just one set of bracketed photos, you can take two. Though the exposures remain the same for the two sets, the additional images give PhotoEngine more data to work with.
What is the difference between Ghost Removal Method 1 and Method 2? The two methods use very different approaches to detect and remove moving objects. In most cases, Method 2 is superior to Method 1 especially with photos containing many moving objects. By default, it is recommended to use Method 2. If Method 2 fails, try Method 1.
Enabling Auto Align:
Enabling Ghost Removal:
After choosing the HDR ToneMap options, you are ready to create the project.
Creating the HDR ToneMap project:
PhotoEngine automatically switches to the Edit Workspace and starts loading the photos.
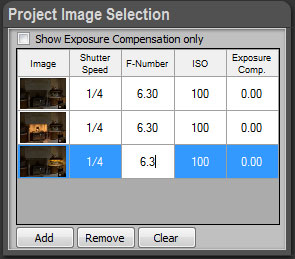
What to do when the HDR ToneMap panel displays an error message? When your photos do not contain Exif data or have missing Exif data, the HDR ToneMap Panel will display an information message such as: “Shutter speed values are required to build an HDR ToneMap Project”.
If this happens you can enter missing data by hand. The Project Image Selection panel works like a small spreadsheet. You can click in any cells to enter a missing value.
Manually setting missing data:
|
|
| Copyright © 2025 Oloneo SAS |