|
Last modified: 2011-06-02
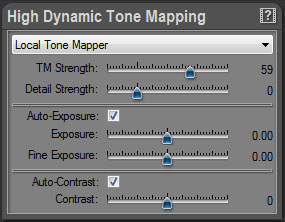
HDR ToneMap: Local Tone MapperOverviewThe Local Tone Mapper is the default Tone Mapping tool. It is selected by default when creating a new project. The Local Tone Mapper settings are displayed in the High Dynamic Tone Mapping panel when Local Tone Mapper is selected in the menu located at the top. The settings are grouped in three categories:
Main Tone Mapping settingsThe main Tone Mapping settings are controlled by the TM Strength and Detail Strength sliders.
Editing the Tone mapping settings:
What is TM Strength? TM Strength stands for Tone Mapping Strength. It is the Tone Mapping master control. Increase the value to reduce global image contrast while keeping the detail contrast unchanged. The higher the value the more you will recover burned highlights and underexposed shadows.
TM Strength values: By default the value is 0 meaning no Tone Mapping. The image is displayed “as is”. For most images, use values from 0 to 65. In this range, Tone Mapping varies from low to fairly high while maintaining a natural image. For special effects, use values from 65 to 100. Around 85 the Tone Mapping becomes extreme with global contrast near to zero. High values usually require an increase in Detail Strength. Summary:
TM Strength value can become negative?! Absolutely and it is a unique feature! For negative values, PhotoEngine switches to a special mode and applies an Anti-Tone Mapping to the image. This mode is usually needed for very peculiar applications such as artificially increasing the Dynamic Range of a low dynamic image or for special effects.
Anti-Tone Mapping can bring interesting effects to black and white photos. With it, you can easily add a film noir effect to your black and white photos.
What is Detail Strength? Detail Strength controls the detail contrast (also called micro contrast). Increasing its value will increase details visibility.
Detail Strength values: By default the value is 0 meaning that the image details are unchanged. For most images, leave the value to zero or slightly increase it up to 100. In this range, detail contrast varies from low to medium and maintains a natural image. For special effects, use values from 100 to 300. High values are useful to create busy images with a high level of detail (the “grunge effect”).
Summary:
Detail Strength value can become negative?! Yes and it is again a unique feature! For negative values, PhotoEngine actually removes details from the image. At -100, all image details are removed. Use this special value range for impressionist effects, to simulate old photos, to create soft, ethereal black and white photos, etc.
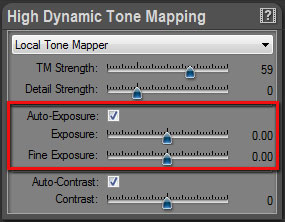
Exposure settingsExposure settings are controlled by the Auto-Exposure checkbox and the Exposure and Fine Exposure sliders.
Editing the Exposure settings:
What is Auto-Exposure? By default, PhotoEngine automatically computes the best possible exposure. The exposure is changed when you modify the TM Strength and Detail Strength values. In most cases, leave the Auto-Exposure enabled.
Auto-Exposure may fail when working with photos incorrectly bracketed or with severely underexposed images. In that case, disable Auto-Exposure and set the exposure manually with the Exposure and Fine Exposure sliders.
What is Exposure and Fine Exposure? The Exposure and Fine Exposure sliders allow you to correct the exposure that was automatically computed by PhotoEngine. For most images, the Exposure slider should remain unchanged unless you disable Auto-Exposure. Use the Fine Exposure to fine tune exposure after using TM Strength and Detail Strength.
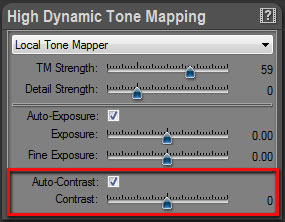
Contrast settingsContrast settings are controlled by the Auto-Contrast checkbox and the Contrast slider.
Editing the Contrast settings:
What is Auto-Contrast? By default, PhotoEngine automatically computes the best possible contrast. The contrast is changed when you modify the TM Strength and Detail Strength values. You should leave the Auto-Contrast enabled in most situations.
Auto- Contrast may fail when working with photos incorrectly bracketed or with severely underexposed images. In that case, disable Auto- Contrast and set the contrast manually with the Contrast slider.
What is Contrast? The Contrast slider allows you to correct the contrast that was automatically computed by PhotoEngine. Use the Contrast slider to fine tune contrast after using TM Strength and Detail Strength.
|
|
| Copyright © 2025 Oloneo SAS |